Différences entre versions de « Java ws restful »
| Ligne 250 : | Ligne 250 : | ||
** ''@Path'' pour spécifier l'URL d'accès au Web Service. | ** ''@Path'' pour spécifier l'URL d'accès au Web Service. | ||
| + | Voici les annotations utilisées par Jersey: | ||
| + | <div align="center"> | ||
| + | {|class="wikitable" width="85%" | ||
| + | ! Annotation !! Description | ||
| + | |-valign=top | ||
| + | || | ||
| + | @PATH(your_path) | ||
| + | || | ||
| + | Sets the path to base URL + /your_path. The base URL is based on your application name, the servlet and the URL pattern from the web.xml configuration file. | ||
| + | |- | ||
| + | || | ||
| + | @POST | ||
| + | || | ||
| + | Indicates that the following method will answer to an HTTP POST request. | ||
| + | |- | ||
| + | || | ||
| + | @GET | ||
| + | || | ||
| + | Indicates that the following method will answer to an HTTP GET request. | ||
| + | |- | ||
| + | || | ||
| + | @PUT | ||
| + | || | ||
| + | Indicates that the following method will answer to an HTTP PUT request. | ||
| + | |- | ||
| + | || | ||
| + | @DELETE | ||
| + | || | ||
| + | Indicates that the following method will answer to an HTTP DELETE request. | ||
| + | |- | ||
| + | || | ||
| + | @Produces(MediaType.TEXT_PLAIN[, more-types]) | ||
| + | || | ||
| + | @Produces defines which MIME type is delivered by a method annotated with @GET. In the example text ("text/plain") is produced. Other examples would be "application/xml" or "application/json". | ||
| + | |- | ||
| + | || | ||
| + | @Consumes(type[, more-types]) | ||
| + | || | ||
| + | @Consumes defines which MIME type is consumed by this method. | ||
| + | |- | ||
| + | || | ||
| + | @PathParam | ||
| + | || | ||
| + | Used to inject values from the URL into a method parameter. This way you inject, for example, the ID of a resource into the method to get the correct object. | ||
| + | |} | ||
| + | </div> | ||
| + | <div align="right"> | ||
| + | <small>[http://www.vogella.com/tutorials/REST/article.html#restjersey source]</small> | ||
| + | </div> | ||
N'oubliez pas de démarrer le serveur Tomcat avant de poursuivre ! | N'oubliez pas de démarrer le serveur Tomcat avant de poursuivre ! | ||
Version du 17 avril 2015 à 10:02
Introduction
Après la lecture du cours sur les Web Services, nous allons voir comment "fabriquer" notre propre Web Service Restful avec JAX-RS, GSON et Tomcat.
Ce Web Service permettra le CRUD (Create / Read / Update / Delete) d'utilisateurs, fonctionnalité plus que nécessaire dans les applications...
JAX-RS
Java définit le support de REST à travers la JSR 311 (Java Specification Request). Cette spécification est appelée JAX-RS (The Java API for RESTful Web Services).
JAX-RS utilise des annotations pour définir le caractère RESTful de certaines classes Java.
Jersey
JAX-RS étant uniquement une spécification (un bout de papier) nous n'allons pas pouvoir faire grand chose si nous n'utilisons pas une librairie qui implémente ces spécifications.
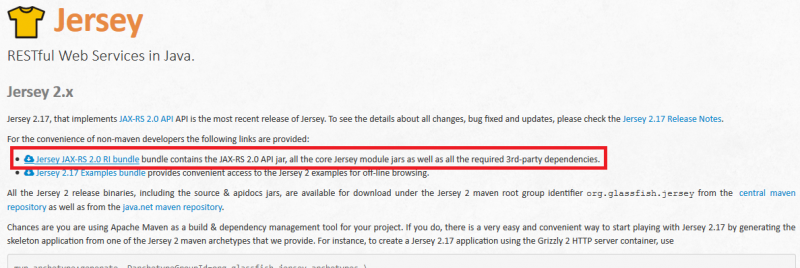
C'est justement l'objectif de Jersey que vous pouvez télécharger en cliquant sur le lien ci-dessous:
GSON
Comme décrit dans le cours, On manipule des représentations des ressources, par les ressources directement.
La représentation de nos ressource se fera en JSON et l'implémentation que nous allons utiliser et celle faite par Google: GSON.
Vous pouvez la télécharger ici
Préparation du projet
Tout d'abord, il faut créer un projet sous Eclipse comme décrit ici.
Ajout des librairies
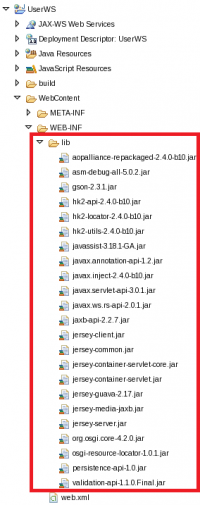
Il faut extraire les librairies précédemment téléchargées dans le dossier WebContent → WEB-INF → lib de votre projet:
Modification du web.xml
C'est dans le fichier web.xml que nous allons ajouter les indications qui vont permettre à Tomcat de trouver vos Web Services. Rappel : ce fichier se trouve dans le répertoire WebContent → WEB-INF
<?xml version="1.0" encoding="UTF-8"?>
<web-app xmlns:xsi="http://www.w3.org/2001/XMLSchema-instance"
	xmlns="http://java.sun.com/xml/ns/javaee"
	xsi:schemaLocation="http://java.sun.com/xml/ns/javaee http://java.sun.com/xml/ns/javaee/web-app_3_0.xsd"
	id="WebApp_ID" version="3.0">
	<display-name>userws</display-name>
	<servlet>
		<servlet-name>Jersey REST Service</servlet-name>
		<servlet-class>org.glassfish.jersey.servlet.ServletContainer</servlet-class>
		<init-param>
			<param-name>jersey.config.server.provider.packages</param-name>
			<param-value>fr.pigier.user.rest</param-value>
		</init-param>
		<load-on-startup>1</load-on-startup>
	</servlet>
	<servlet-mapping>
		<servlet-name>Jersey REST Service</servlet-name>
		<url-pattern>/rest/*</url-pattern>
	</servlet-mapping>
</web-app>
Quelques explications s'imposent:
- <display-name>...</display-name> → permet de définir le nom de l'application.
- <servlet>...</servlet> → permet de définir une Servlet.
- <servlet-name>...</servlet-name> → nom de la Servlet.
- <servlet-class>...</servlet-class> → classe de la Servlet.
- <init-param>...</init-param> → définit un paramètre à passer à la Servlet
- <param-name>...</param-name> → le nom du paramètre
- <param-value>...</param-value> → sa valeur
- <load-on-startup>1</load-on-startup> → permet de démarrer la Servlet au démarrage de la WebAPP (application)
- <servlet-mapping></servlet-mapping> → permet de définir un mapping entre une Servlet et une URL
- <servlet-name>...</servlet-name> → le nom de la Servlet comme définit dans la balise <servlet>
- <url-pattern>...</url-pattern> → l'URL utilisée pour joindre la Servlet
Le principe de fonctionnement est simple: on spécifie le package où se trouve les classes qui contiennent les Web Service RESTful (fr.pigier.user.rest) et Jersey se charge du reste.
Création de l'application
Les packages
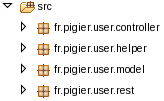
Nous aurons besoin des packages suivants:
- fr.pigier.user.model → pour les classes correspondants au modèle ;
- fr.pigier.user.rest → pour nos Web Services ;
- fr.pigier.user.helper → pour les classes servant à faire des traitements autonomes.
Création du modèle
Avant de pouvoir offrir une représentation d'un objet... il nous faut un objet ! Créez une classe User avec les attributs suivant:
- id;
- login;
- password;
package fr.pigier.user.model;

public class User {

	private String login, password;
	private int id;
	/**
	 * @param login
	 * @param password
	 * @param id
	 */
	public User( int id, String login, String password) {
		super();
		this.login = login;
		this.password = password;
		this.id = id;
	}
	/**
	 * @return the login
	 */
	public String getLogin() {
		return login;
	}
	/**
	 * @param login the login to set
	 */
	public void setLogin(String login) {
		this.login = login;
	}
	/**
	 * @return the password
	 */
	public String getPassword() {
		return password;
	}
	/**
	 * @param password the password to set
	 */
	public void setPassword(String password) {
		this.password = password;
	}
	/**
	 * @return the id
	 */
	public int getId() {
		return id;
	}
	/**
	 * @param id the id to set
	 */
	public void setId(int id) {
		this.id = id;
	}
	/* (non-Javadoc)
	 * @see java.lang.Object#hashCode()
	 */
	@Override
	public int hashCode() {
		final int prime = 31;
		int result = 1;
		result = prime * result + id;
		result = prime * result + ((login == null) ? 0 : login.hashCode());
		result = prime * result
				+ ((password == null) ? 0 : password.hashCode());
		return result;
	}
	/* (non-Javadoc)
	 * @see java.lang.Object#equals(java.lang.Object)
	 */
	@Override
	public boolean equals(Object obj) {
		if (this == obj)
			return true;
		if (obj == null)
			return false;
		if (getClass() != obj.getClass())
			return false;
		User other = (User) obj;
		if (id != other.id)
			return false;
		if (login == null) {
			if (other.login != null)
				return false;
		} else if (!login.equals(other.login))
			return false;
		if (password == null) {
			if (other.password != null)
				return false;
		} else if (!password.equals(other.password))
			return false;
		return true;
	}
	/* (non-Javadoc)
	 * @see java.lang.Object#toString()
	 */
	@Override
	public String toString() {
		return "User [login=" + login + ", password=" + password + ", id=" + id
				+ "]";
	}

}
Création du Web Service
La classe qui va gérer notre Web Service est un objet classique et non une Servlet !
Elle utilise uniquement les annotations JAX-RS comme énoncé plus haut:
package fr.pigier.user.rest;

import javax.ws.rs.GET;
import javax.ws.rs.Path;
import javax.ws.rs.Produces;
import javax.ws.rs.core.MediaType;

import fr.pigier.user.model.User;

@Path("/user")
public class UserWS {

	private User user;

	public UserWS() {
		user = new User(0, "jc", "forton");
	}

	@GET
	@Produces(MediaType.TEXT_PLAIN)
	public String getUserText() {
		return user.toString();
	}

	@GET
	@Produces(MediaType.TEXT_HTML)
	public String getUserHtml() {
		String html = "<html> " + "<title>" + "User" + "</title>"
		        + "<body><h1>" + user.toString() + "</body></h1>" + "</html> ";
		return html;
	}

	@GET
	@Produces(MediaType.TEXT_XML)
	public String getUserXml() {
		String xml = "<?xml version=\"1.0\"?><user id=" + user.getId()
				+ " login=" + user.getLogin() + " password="
				+ user.getPassword() + "></user>";
		return xml;
	}

}
Comme on peut le constater, la classe UserWS possède:
- une méthode :
- getUserText qui renvoie une réponse formaté en text ;
- getUserHTML qui renvoie une réponse formaté en HTML ;
- getUserXml qui renvoie une réponse formaté en XML.
- des annotations :
- @GET pour spécifier le type de requête ;
- @Produces pour spécifier le type de retour;
- @Path pour spécifier l'URL d'accès au Web Service.
Voici les annotations utilisées par Jersey:
| Annotation | Description |
|---|---|
|
@PATH(your_path) |
Sets the path to base URL + /your_path. The base URL is based on your application name, the servlet and the URL pattern from the web.xml configuration file. |
|
@POST |
Indicates that the following method will answer to an HTTP POST request. |
|
@GET |
Indicates that the following method will answer to an HTTP GET request. |
|
@PUT |
Indicates that the following method will answer to an HTTP PUT request. |
|
@DELETE |
Indicates that the following method will answer to an HTTP DELETE request. |
|
@Produces(MediaType.TEXT_PLAIN[, more-types]) |
@Produces defines which MIME type is delivered by a method annotated with @GET. In the example text ("text/plain") is produced. Other examples would be "application/xml" or "application/json". |
|
@Consumes(type[, more-types]) |
@Consumes defines which MIME type is consumed by this method. |
|
@PathParam |
Used to inject values from the URL into a method parameter. This way you inject, for example, the ID of a resource into the method to get the correct object. |
N'oubliez pas de démarrer le serveur Tomcat avant de poursuivre !
Utilisation du Web Service
Contenu HTML
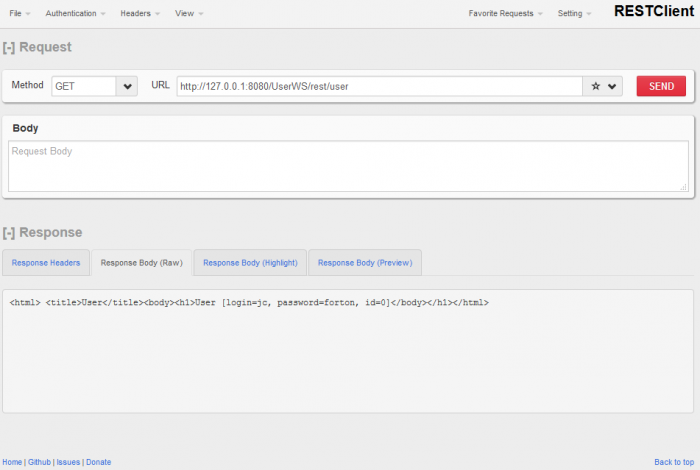
Nous allons utiliser RESTClient, un plugin Firefox, pour tester notre Web Service.
Il suffit d'utiliser l'URL suivante pour accéder à votre Web Service: http://127.0.0.1:8080/UserWS/rest/user
Autres contenus
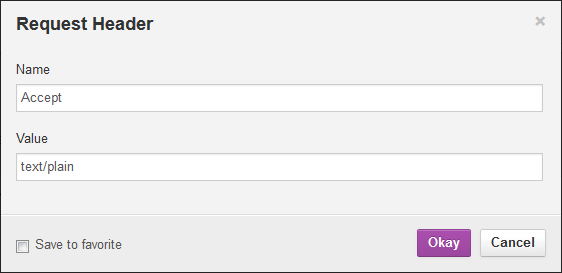
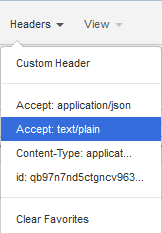
Par défaut, le contenu renvoyé sera en HTML. Si vous désirez retourner un contenu dans un autre format, il faudra ajouter le header Accept:
Spécifiez le type de retour souhaité et ajoutez le :
| → |
Le retour du Web Service est alors modifié en fonction de ce header :
- text/html ;
- text/plain ;
- text/xml ;
Formatage en JSON
Pour formater en JSON, il faut utiliser la librairie
